A blog about Macintosh and its Modification Projects. We have a channel in youtube and our related web site is www.siivel.com. Please come and visit and share if you like!
Translate
Wednesday, December 31, 2014
256GB SD Card, not 256MB...
Bought an ADATA 256GB SD card recently in a bargain sale for about US$70.
Thursday, December 18, 2014
iBook Clamshell Mod - Connecting the LCD Panel with the Main Body
This is one of the passages about the iBook G3 Clamshell modification project, of which a logicboard of Intel i5 was being installed into the classic Apple iBook G3 Laptop.
Instead of using a 800x600 resolution LCD panel, we replace it by a new one with 1024x768. It is because a 800x600 LCD couldn't show all contents of Mac OSX Yosemite.
Instead of using a 800x600 resolution LCD panel, we replace it by a new one with 1024x768. It is because a 800x600 LCD couldn't show all contents of Mac OSX Yosemite.
After we install the new LCD, we rearrange the wires as shown in the above picture. Then we attached the LCD with the main body of the iBook.
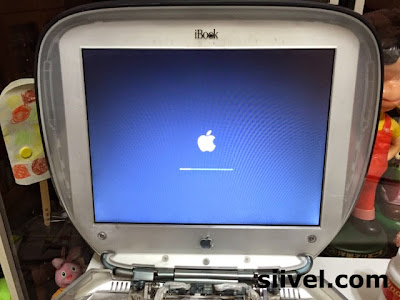
Now, the LCD was connected to the body of iBook. And it was booting Mac OSX Yosemite.
Enjoy~
Related Articles:
iBook Clamshell Mod - SD Card Slot as A Substitute of DVD Rom
Written by: Erik Siivel (@siivel.com)
Modder | Producer | Blogger | Youtuber
Email: siiveldotcom@gmail.com
Labels:
1024x768,
Apple,
Clamshell,
Core i5,
G3,
Haswell,
iBook,
Intel,
LCD,
Macbook Air,
Modification,
Modify,
Siivel,
siivel.com,
クラムシェル,
シェル,
改,
改造,
改造計劃,
改造計画
Thursday, November 27, 2014
iBook Clamshell Mod - Yo-Yo Adapter Modified
The adapter is very crucial for iBook modification because we need to power on the iBook to continue our work, or our work will merely stay in the theoretical level. Today, the adapter is done ! (^^)
After modification, it becomes:
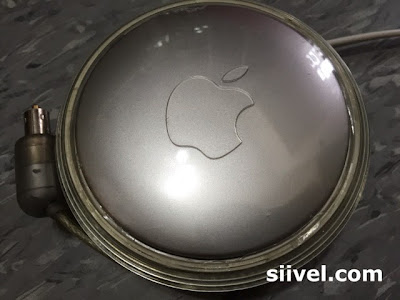
This was the original outlook of the Apple adapter.
After we modified it and polished it, it becomes:
(Actually no change in outlook, but has a change in output voltage from 24V to 14V ^^)
The below photo is showing the original outbook of the bottom of the adapter:
After modification, it becomes:
(Also no change in outlook :-D)
However it seems unavoidable to have cracks on the shell of the adapter, like the pic below ... as it was crack-opened by us previously. So if anyone of you knows the way to open the Yo-Yo adapter beautifully, please tell us by mail.
Related Articles:
iBook Clamshell Mod - SD Card Slot as A Substitute of DVD Rom
Written by: Erik Siivel (@siivel.com)
Modder | Producer | Blogger | Youtuber
Email: siiveldotcom@gmail.com
Labels:
Apple,
Clamshell,
G3,
iBook,
iBook G3 i5,
Modification,
Modify,
Siivel,
siivel.com,
Yo-Yo Adapter,
クラムシェル,
シェル,
改,
改造,
改造計画
Tuesday, November 25, 2014
iBook Clamshell Mod - Modifying the Yo-Yo
As we need to change some of the contents of the Apple Yo-Yo Adapter to provide right voltage for the new motherboard, we have taken apart the Apple Yo-Yo Adapter. Also, we noted that the power cords are already "too old" and replacement is also needed.
Luckily, we got one brand-new 3.5mm power cord for iBook from ebay. At the same time, the the wall plug cord has also been replaced.
Related Articles:
Labels:
Apple,
Clamshell,
Ebay,
G3,
iBook,
Modification,
Modify,
Siivel,
siivel.com,
Yo-Yo Adapter,
クラムシェル,
シェル,
改,
改造,
改造計劃,
改造計画
Sunday, November 23, 2014
This is Perhaps the Worst Physical Condition iBook
Yesterday we have an excellent condition iBook. Now, we have the worst one, perhaps...
I bought it from an auction site for about US$15. Originally I damaged the screen cover hinge during modifying my iBook so I need a pair for urgent replacement, or the work will be suspended, so I bought it disregard its condition. I think the deal is reasonable.
The Apple logo of this iBook has been missing already. and the Apple leaf is scamming with dirts. The keyboard was glued with the laptop case. The whole case has also been yellowing. Perhaps the previous owner is a smoker.
There is severe discolouration in the lower case.
Recently when I inspected the conditions of my iBook collection, I note that the indigo one has the LCD obsolete. Fortunately, this LCD is still in good condition, I could take it apart and to replace the one of my indigo's. Also it has a working Yo-Yo adapter. And most importantly it can supply spare parts and screws for my iBook mod.
Saturday, November 22, 2014
Old iBook Clamshell of 15 Years of Age
Compare with latest notebook models, which are retangular-shaped, with just upgrade to higher specifications, wider screen, thinner body, the design of iBook Clamshell are even more remarkable.
Among all colours of iBook, I am most attracted to the tangerine and key-lime. However, it is difficult to find a second-handed iBook locally (as Macintosh was not popular here 15 years ago). So normally I will go for them fom ebay.
Today I received one tangerine from a foreign seller. It costedeme about US$150 (item + shipping). Quite expensive, but I think it is worthwhile, as its condition is incredibly good.
Friday, November 21, 2014
Macbook Air (Early 2014) Magic Trackpad Tear Opening
I am very courious about the Track Pad of Macbook Air 2014, how come it operates with a tiny logic board. So I teared open it. Ithink this might be the first tear-down of this kind in the internet (^^).
There is a aluminium bar adhere to the back of the Track Pad. Remove it.
A layer of sensor is attached with the Track Pad. Tear it gentelly and slowly.
Finally, we did it. I noted that actually the upper layer Magic Track Pad is just glass, instead of metal.
Written by: Erik Siivel (@siivel.com)
Modder | Producer | Blogger | Youtuber
Email: siiveldotcom@gmail.com
The Macbook Air (Early 2014) Track Pad
There is little articles talking about the Magic Track Pad of 2014 Macbook Air.
Here is the front of the Track Pad. Its dimension is 10.5cm x 6.2cm.
And here is the back of the Track Pad. The associated logic board is incredibly small. There are some words on it:
DO642876E
DQF940AP5A
MADE IN CHINA
At the lower middle there is a circle button for sending signal upon "clicking" on it.
Written by: Erik Siivel (@siivel.com)
Modder | Producer | Blogger | Youtuber
Email: siiveldotcom@gmail.com
Thursday, November 20, 2014
The iBook Clamshell Track Pad
 |
| Back of the Trackback |
This is the trackpad took apart from a 2nd Gen iBook Clamshell. This is the back of the trackpad. The diameter of the board itself is 6.5cm x 4.9cm.
There are words: "SYNAPTICS, INC." On it. And on the white label, the words are:
TM41TUZ225-5
CG037-049
MADE IN CHINA
RY0370EX3J2KA
On the ribbon cable, there are also some word:
KEOU28011110U02
TRACK PAD 632-0124-A
 |
| Front of the Trackpad |
And this is the front of the same trackpad.
Written by: Erik Siivel (@siivel.com)
Modder | Producer | Blogger | Youtuber
Email: siiveldotcom@gmail.com
Wednesday, November 19, 2014
iBook Clamshell Mod - Applying Protective Skin on the Shell
This is one of the passages about the iBook G3 Clamshell modification project, of which a logicboard of Intel i5 was being installed into the classic Apple iBook G3 Laptop.
In my last blog, I have DIY a protective film for the cover of iBook G3 Clamshell. Now it is the turn for applying it onto the cover of iBook G3 Clamshell.
There are some "tips" about applying the protective skins onto an object:
(1) Allow more water to stay between the protective film and the object, because water enables easy repositioning of the skin. Also, ejecting the water out of the gap is easier than that of air bubbles.
(2) After you positioned the skins, place a dry towel beneath the object and use a squeegee (e.g.) credit card to sweep the skin surface to eject the water out of the space between the object and the protective film. The excess water will be absorbed by the towel right away.
(3) Then, sock the residual water on the object thoroughly.
(4) Finally, I suggest you to place the object into the dry dehumidity cabinet box overnight, this will speed up drying process and reduce the harm of humidity to the electrical component of the object concerned.
Related Articles:
iBook Clamshell Mod - SD Card Slot as A Substitute of DVD Rom
Written by: Erik Siivel (@siivel.com)
Modder | Producer | Blogger | Youtuber
Email: siiveldotcom@gmail.com
Labels:
Apple,
bestskinsever,
iBook,
iBook Clamshell,
iBook G3,
Protective film,
Protective Skin,
クラムシェル,
シェル,
改,
改造,
改造計劃,
改造計画
Tuesday, November 18, 2014
iBook Clamshell Mod - DIY Protective Skin for the Shell
iBook Clamshell, like iPad, iPod or iPhone, is a personal device and designed for being carried around. So It should be warped with protective skin against scratches. However, it is an old product and tailor-made protective film is not available.
 | ||
| The Best Skin Ever DIY Skin Arrived |
I have ordered DIY skin from Bestskinsever.com and customized it to fit the upper case of iBook.
First, apply "Tamiya Masking Tape" onto the shell of iBook. The advantage of this tape is that there will be no residual after removal.
Second, remove the Masking Tape gradually in order to keep the shap of the Masking Tape. Then cut it apart (as suggested by the above photo) until it is flattened and can adhere completely to the protective film.
We cut the protective skin along the shape of the Masking Tape. Now a DIY protective firm for the iBook is made.
Related Articles:
iBook Clamshell Mod - SD Card Slot as A Substitute of DVD Rom
Written by: Erik Siivel (@siivel.com)
Modder | Producer | Blogger | Youtuber
Email: siiveldotcom@gmail.com
Labels:
Apple,
bestskinsever,
Clamshell,
DIY,
G3,
iBook,
Protective film,
Protective Skin,
Siivel,
siivel.com,
クラムシェル,
シェル,
改,
改造,
改造計劃,
改造計画
iBook Clamshell Mod - Polish the Apple Logo
It is not uncommon to have heavy scratches on Apple Logo for iBook Clamshell. It is because its upper case is convex in shape and that logo is situated the "Uppermost" of the upper case.
Applying polish liquid to rub the apple logo is easy, for details, please watch this video:
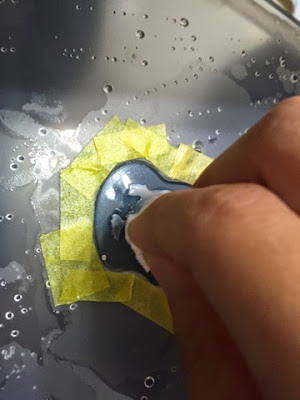
Use Masking Tape to protect those area which do not need polishing. And then apply small amount of polish liquid on the Apple logo and rub by a piece of cloth.
Now, done! The Apple Logo has been made glossy. b(^ .^)b
Related Articles:
iBook Clamshell Mod - SD Card Slot as A Substitute of DVD Rom
Written by: Erik Siivel (@siivel.com)
Modder | Producer | Blogger | Youtuber
Email: siiveldotcom@gmail.com
Subscribe to:
Posts (Atom)


