Translate

Showing posts with label クラムシェル. Show all posts

Tuesday, March 24, 2015

iBook Clamshell Mod - Keyboard and Trackpad Attached

This is one of the passages about the iBook G3 Clamshell modification project, of which a logicboard of Intel i5 was being installed into the classic Apple iBook G3 Laptop.
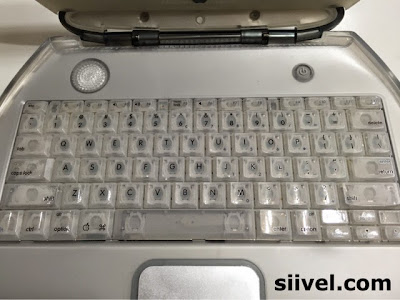
It is already the final stage of the iBook G3 Clamshell modification project. Yesterday, I attached the original Keyboard and Trackpad to the iBook Clamshell. Afterwards, I tested them thoroughly, by pressing the keys one by one. Also, I tried to use the combination keys such as reseting PRAM, all worked in order. Test results were satisfactory.

Apple, Clamshell, Core, G3, Haswell, i5, i7, iBook, Intel, Keyboard, Mac, Magic Trackpad, Mod, Modification, OSX, Trackpad, Upgrade, 改, 改造, 改造計画, Macintosh, 改造計劃, Siivel, siivel.com, クラムシェル, シェル,

It is however quite disappointed that the Cap Lock Button could not be lit. And as to the Trackpad, originally, I intended to install the Magic Trackpad into the iBook but subsequently in vain.

Nevertheless, it is already a successful mod, in terms of keeping the original outlook at the same time, retain the original functions of those peripherials.

Apple, Clamshell, Core, G3, Haswell, i5, i7, iBook, Intel, Keyboard, Mac, Magic Trackpad, Mod, Modification, OSX, Trackpad, Upgrade, 改, 改造, 改造計画, Macintosh, 改造計劃, Siivel, siivel.com, クラムシェル, シェル,


The "skin" if the Trackpad has been replaced by a new one (as the old one had been "polished" by repeated usage), and covered by the a layer of Bestskinsever. 

Sunday, January 11, 2015

iBook Clamshell Mod - What is iBook Clamshell?

This is one of the passages about the iBook G3 Clamshell modification project, of which a logicboard of Intel i5 was being installed into the classic Apple iBook G3 Laptop.
Apple, CD Rom, Clamshell, Ethernet, Firewire, G3, iBook, Modem, Optical Drive, PowerPC, Steve Jobs, USB, wireless networking, クラムシェル, シェル, 改, 改造, 改造計劃, 改造計画, siivel.com, Siivel,  

iBook G3 is a series of consumer portable laptop launched by Apple. It was first introduced by Steve Jobs during the keynote presentation of Macworld Conference & Expo in New York City on 21 June 1999.

The first generation iBook has a clam shell outlook, so it was called "iBook Clamshell" to distinguish from its succeeding models. Its body is translucent either in Tangerine (Orange) and Blueberry (Blue) colour. It has a PowerPC G3 CPU, USB, Ethernet, modem ports, an optical drive and designed with integrated wireless networking.

On February 16, 2000, Apple issued the iBook SE (Special Edition) which is in Graphite (grey) colour. 

On 13 Sept 2000, Apple issued the iBook (FireWire) which is in Indigo (Blue), Graphite and Key Lime (Green) colour.

On 1 May 2001, iBook Clamshell was discontinued and replaced by the next generation iBook G3 Dual USB in Snow colour.


Related Articles:


Thursday, December 18, 2014

iBook Clamshell Mod - Connecting the LCD Panel with the Main Body

This is one of the passages about the iBook G3 Clamshell modification project, of which a logicboard of Intel i5 was being installed into the classic Apple iBook G3 Laptop.
Instead of using a 800x600 resolution LCD panel, we replace it by a new one with 1024x768. It is because a 800x600 LCD couldn't show all contents of Mac OSX Yosemite.


1024x768, 800x600, Apple, Clamshell, G3, Haswell, iBook, Intel, Core i5, LCD, Macbook Air, Modification, Modify, Siivel, siivel.com, クラムシェル, シェル, 改, 改造, 改造計画, 改造計劃,

After we install the new LCD, we rearrange the wires as shown in the above picture. Then we attached the LCD with the main body of the iBook.

1024x768, 800x600, Apple, Haswell, iBook, Clamshell, G3, Modify, Modification, クラムシェル, シェル, Intel Core i5, LCD, Macbook Air, 改, 改造, 改造計画, siivel.com, Siivel,

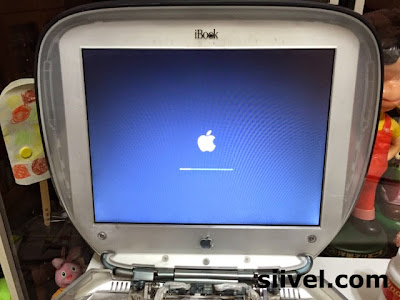
Now, the LCD was connected to the body of iBook. And it was booting Mac OSX Yosemite.

We have a video about this iBook G3 booting Mac OSX Yosemite:

http://youtu.be/X1wdGIpPuk4

Thursday, November 27, 2014

iBook Clamshell Mod - Yo-Yo Adapter Modified

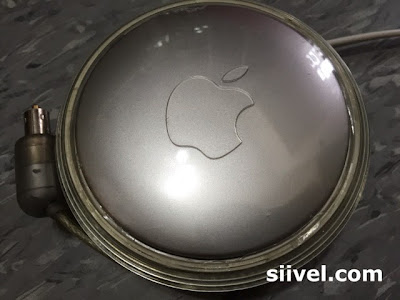
The adapter is very crucial for iBook modification because we need to power on the iBook to continue our work, or our work will merely stay in the theoretical level. Today, the adapter is done ! (^^)


This was the original outlook of the Apple adapter.

After we modified it and polished it, it becomes:

Apple, iBook, Clamshell, G3, iBook G3 i5, Modification, Modify, Yo-Yo Adapter, クラムシェル, シェル, 改, 改造, 改造計画, Siivel, siivel.com,

 (Actually no change in outlook, but has a change in output voltage from 24V to 14V ^^)

The below photo is showing the original outbook of the bottom of the adapter:

Apple, iBook, Clamshell, G3, iBook G3 i5, Modification, Modify, Yo-Yo Adapter, クラムシェル, シェル, 改, 改造, 改造計画, Siivel, siivel.com,

After modification, it becomes:

Apple, iBook, Clamshell, G3, iBook G3 i5, Modification, Modify, Yo-Yo Adapter, クラムシェル, シェル, 改, 改造, 改造計画, Siivel, siivel.com,

 (Also no change in outlook :-D)

However it seems unavoidable to have cracks on the shell of the adapter, like the pic below ... as it was crack-opened by us previously. So if anyone of you knows the way to open the Yo-Yo adapter beautifully, please tell us by mail.

Wednesday, November 19, 2014

iBook Clamshell Mod - Applying Protective Skin on the Shell

This is one of the passages about the iBook G3 Clamshell modification project, of which a logicboard of Intel i5 was being installed into the classic Apple iBook G3 Laptop.
In my last blog, I have DIY a protective film for the cover of iBook G3 Clamshell. Now it is the turn for applying it onto the cover of iBook G3 Clamshell.

There are some "tips" about applying the protective skins onto an object:

(1) Allow more water to stay between the protective film and the object, because water enables easy repositioning of the skin. Also, ejecting the water out of the gap is easier than that of air bubbles.

(2) After you positioned the skins, place a dry towel beneath the object and use a squeegee (e.g.) credit card to sweep the skin surface to eject the water out of the space between the object and the protective film. The excess water will be absorbed by the towel right away.

(3) Then, sock the residual water on the object thoroughly.

(4) Finally, I suggest you to place the object into the dry dehumidity cabinet box overnight, this will speed up drying process and reduce the harm of humidity to the electrical component of the object concerned.

Tuesday, November 18, 2014

iBook Clamshell Mod - DIY Protective Skin for the Shell

iBook Clamshell, like iPad, iPod or iPhone, is a personal device and designed for being carried around. So It should be warped with protective skin against scratches. However, it is an old product and tailor-made protective film is not available.

Apple, bestskinsever, DIY, iBook, Clamshell, G3, Protective film, Protective Skin, クラムシェル, シェル, 改, 改造, 改造計劃, 改造計画, Siivel, siivel.com,
The Best Skin Ever DIY Skin Arrived  

I have ordered DIY skin from Bestskinsever.com and customized it to fit the upper case of iBook.

Apple, bestskinsever, DIY, iBook, Clamshell, G3, Protective film, Protective Skin, クラムシェル, シェル, 改, 改造, 改造計劃, 改造計画, Siivel, siivel.com,

First, apply "Tamiya Masking Tape" onto the shell of iBook. The advantage of this tape is that there will be no residual after removal.

Second, remove the Masking Tape gradually in order to keep the shap of the Masking Tape. Then cut it apart (as suggested by the above photo) until it is flattened and can adhere completely to the protective film.


Apple, bestskinsever, DIY, iBook, Clamshell, G3, Protective film, Protective Skin, クラムシェル, シェル, 改, 改造, 改造計劃, 改造計画, Siivel, siivel.com,

We cut the protective skin along the shape of the Masking Tape. Now a DIY protective firm for the iBook is made.

Related Articles: