Translate

Thursday, November 26, 2015

Studio Display Mod - Take Apart the CRT

Despite the revolution of LCD technology bring about production of HD monitors with 4K or even 5K resolutions, some people still concern not only the screen quality per se but also the overall design of a monitor (like me XD). This is one of the articles about modifying an obseleted Apple Studio Display 17" (ADC) to meet present use.
Here's a Service Source of the Apple Studio 17 Display (ADC). After reading that, you will be able to disassemble your Studio Display:

http://tim.id.au/laptops/apple/displays/studio17adc.pdf

After disassembled the Display, you will have the following stuffs:

(a) the Outer Case - comprising of the front bezel, the rear housing and the stand;
(b) the deflection board; and
(c) the CRT.

Among these, the CRT is our subject matter which needs to be replaced by a LCD.

However, the CRT has leaded glass and poisoning substances inside. So when you take apart of it you need to pay special attention. Remember not to break the glass or you might be exposed to those poisoning substances therein. After take apart the CRT, hand over to e-scarp porofessionals for handling. 

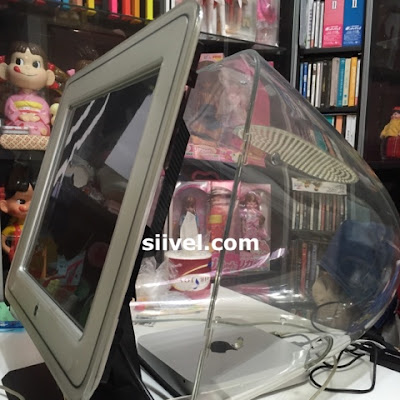
After disassemble the display, I applied glue between the front bezel and a 16" LCD.

Modifying Apple Studio CDT Display (ADC)
Mac OSX Yosemite Shown Up in Apple Studio CRT Display (ADC)

Is that a good idea to modify the display this way?


Modifying Apple Studio CDT Display (ADC)
The CRT was being replaced by a 16" LCD Panel

I think it is amazing to see an Apple Studio CRT Display (ADC) works with a Mac Mini.

It is just the beginning. Please stay tuned to this blog:)

Wednesday, November 25, 2015

Studio Display Mod - An Idea

Despite the revolution of LCD technology bring about production of HD monitors with 4K or even 5K resolutions, some people still concern not only the screen quality per se but also the overall design of a monitor (like me XD). This is one of the articles about modifying an obseleted Apple Studio Display 17" (ADC) to meet present use.
In the early 2000s, Apple manufactured several displays bearing the name as "Studio Display". The Studio Didplay I am referring to, in this article, is the "Apple Studio Display 17 (ADC)", which was introduced by Apple in July 2000 and terminated in May 2001.


Apple Studio CRT Display (ADC)
Apple Studio Display 17 (ADC)


This Apple display is a "D-shaped" monitor with a Diamondtron CRT installed. It has a viewable area of 16”.  Its  connection via an ADC connector meant it could be used with a Power Mac G4 and a Power Mac G4 Cube only.

It is a beautiful monitor with a clear acryl-plastic housing.  The display adapted the Apple Display Connector (ADC) technology which was a new technology at that time which accepts power and signal simultaneously.

It is one of the Masterpieces of Apple. Yet, due to its limited compatibility with merely Power Mac G4 and the G4 Cube, it became obsolete quickly.

Some people had some creative idea changing it into a hamster home. I however thinking if I could make it compatible with the latest Mac. For example, replace the CRT by an LCD, using the mini display port as the connector. Have you got other ideas in modifying this?


Modder | Producer | Blogger | Youtuber
Email: siiveldotcom@gmail.com

Friday, November 13, 2015

How to Use Split View of Mac OSX El Capitan

One of the most appealing features in the new OS X El Capitan is allowing users to put two apps into one screen together, splitting side-by-side. So that you don't need to switch from one application to another via Mission Control.

(However, please note that not all application in Mac OSX El Capitan support the split screen.)

Follow the steps for splitting the screen:


(1) Go to “System Preferences” -> "Mission Control" -> check the box “Displays have separate Spaces”.

(2) Maximize the screen of an application (in this example, Safari) by clicking the green button at the upper-left-hand corner of the window. The application which support split screen should have 2 arrows in opposite directions within the green button, instead of a "+" sign.

Splitting the Screen of Mac OSX El Capitan

(3) Repeat the procedure of (1) for maximizing another window (e.g. TextEdit) which you want to split the screen.


(4) Now you have 2 applications running full-screen mode. Then launch "Mission Control" and you will see 3 thumbnails at the top of the screen, namely, "Desktop", “Safari" and “TextEdit”.


Splitting the Screen of Mac OSX El Capitan

(5) Drag the thumbnail of "TextEdit" into that of “Safari”, or vice versa, then the windows will be merged into one.


Splitting the Screen of Mac OSX El Capitan


Splitting the Screen of Mac OSX El Capitan

(6) To resize the windows, click and drag the black margin between the 2 screen leftwards or rightwards.


Resizing Split Screens
Drag the Black Margins Between 2 Applications to Resize.

Erik Siivel (@siivel.com)
Modder | Producer | Blogger | Youtuber
Email: siiveldotcom@gmail.com
Thursday, November 12, 2015

How to Pin Tab in Safari?

Pinned Tab is a new feature of Safari for Mac OSX El Capitan. For those sites which support Pinned Tab, after one pins the site, a small icon will be shown up at Pinned Tab, otherwise, the first letter will be chosen in lieu of an icon.

Adding a site to Pinned Tab is simple:

(1) Open the site you want to add into the Pin Tab, in my example, Apple.com.

Adding a site to Pinned Tab

(2) Place the pointer on the site tab and right-click (Control+Click), a box "Pin Tab" will appear.


Adding a site to Pinned Tab

(3) Choose "Pin Tab" and the Site's pin icon will be added into the Pinned Tab.


Adding a site to Pinned Tab
Isn't that easy?

Erik Siivel (@siivel.com)
Modder | Producer | Blogger | Youtuber
Email: siiveldotcom@gmail.com


Wednesday, November 11, 2015

"Brightness Slider" for Mac OSX Review

Yesterday I come across an app at Mac App Store which is used to manupulate the screen brightness. It is called "Brightness Slider".

Brightness Slider
Brightness Slider in Mac App Store

Go to Mac App Store -> Download Brightness Slider -> Double-clicked It -> Install

Brightness Slider
The Adjustment Bar is Located in the Menu Bar.
After the installation, there will be a "Sun-shaped" icon on the menu bar. Click it and you can adjust the brightness by either slide with your mouse or the press up/down buttons.

Brightness Slider
Brightness in Maximum Level.


Brightness Slider
Reduce the Brightness. The screen will become completely dark if one slides the bar to the other extreme.
This application is a powerful. With this app, you can control the brightness in the "software level" and the level of darkness could adjust to completely black screen. It frees up 2 function keys of my iBook i5 for other uses.

This app is free at Mac App Store. Worth downloading before it was charged:)

Erik Siivel (@siivel.com)
Modder | Producer | Blogger | Youtuber
Email: siiveldotcom@gmail.com

How to Add a Safari Pinned Tab Icon for Your Site?


Making Pinned Tab Icons
Pinned Tab for Safari


Pinned Tab is a new feature of Safari for Mac OSX El Capitan. For those sites which support Pinned Tab, after one pins the site, a small icon will be shown up at Pinned Tab, otherwise, the first letter will be chosen in lieu of an icon. Therefore, making a Pinned Tab icon outstands your site from others.


Pinned Tab Icon for Safari
siivel.com is Now Pin Tab Supported

We have update our site by adding a Safari Pinned Tab Icon. It is easy.

(1) Made a monochromatic .gif file. For my site's icon, I merely use a black 100x100 pixel gif icon.


(2) Change the .gif icon into .svg file and save it. I do the conversion here:

http://image.online-convert.com/convert-to-svg

And then I save it as img.svg in my web-site server.


(3) Add the following link into the "header" of the site:


<header><link rel=”mask-icon” href=”img.svg” color=”Black”></header>


Remarks: (1) "img.svg" is the file name of my image. You might change the link's .svg name in line with your own image; (2) In my case, the colour of the icon is default as "Black", you might however decide your icon's colour yourself.


(4) Restart Safari and finished.


Written by: Erik Siivel (@siivel.com)
Modder | Producer | Blogger | Youtuber 
Email: siiveldotcom@gmail.com

Tuesday, November 10, 2015

Updating iStat Menus, Pages, Numbers and Keynote

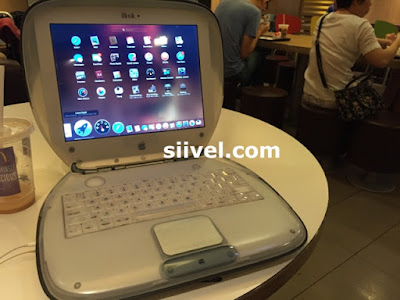
Today, I install some applications for my iBook i5. They are, namely, iStat Menus, Pages, Numbers, and Keynote.

Installing iStat Menus, Pages, Numbers and Keynote
Installing iStat Menus, Pages, Keynote and Numbers in McDonald's.

The iStat Menus is the tool monitoring the hardware of the Mac, including the CPU and RAM usage, network speed, battery life, fan speed and temperature. 

One could even use the iStat Menus to manupulate the fan speed.

I bought previous version of iStat Menus months ago to monitor my iBook i5. After upgrading to OSX El Capitan from Yosemite, I noted that there is an upgrade for free so I install it accordingly.

As to Pages, Numbers and Keynote, I used to compose documents with Open Office. Now as those apps become free; declared to be compatible with Microsoft Office; and most importantly, now it appears that they become indispensable components of Mac OS and iCloud; I think they are worth trying and thus install accordingly.

Written by: Erik Siivel (@siivel.com)
Modder | Producer | Blogger | Youtuber 
Email: siiveldotcom@gmail.com

Monday, November 9, 2015

iBook i5 with Mac OSX El Capitan Upgraded

Here's my last article in this blog about upgrading the OS of the iMac G3 i7 to OSX El Capitan:

After that upgrade, everything were running smoothly.

Now it is the turn for my iBook i5. iBook i5 is not my primary system, hence the upgrade was relatively easier. The procedure was the same with that of iMac G3 i7:

Go to Mac App Store -> Download OSX El Capitan -> Launch it -> Wait

One needs to plug the adapter or the Mac won't allow the installation to begin.


iBook i5 Mac OSX El Capitan Upgrade
The iBook i5 is installing the OSX El Capitan

The installation took about 60-70 minutes.

iBook i5 Mac OSX El Capitan Upgrade
Installation Finished!

iBook i5 Mac OSX El Capitan Upgrade
Now the iBook i5 Comes with a New Operating System.

I haven't made an upgrade video for my iMac G3 i7, but have for this iBook, that is a short video and the URL is:


See you soon!

Written by: Erik Siivel (@siivel.com)
Modder | Producer | Blogger | Youtuber 

Email: siiveldotcom@gmail.com

Saturday, November 7, 2015

(Got It!) The Stand for 17" Apple Studio (CRT) Display

This May, I bought a vintage Apple Studio  (CRT) display with a damaged stand.

http://siiveldotcom.blogspot.com/2015/03/wanted-stand-for-17-apple-studio-crt.html

This Apple Studio (CRT) Display is a classical fantastic collector item. It is difficult to imagine that one will smash it and give me the stand. Nevertheless, I keep searching at ebay and some auction sites.


Apple Studio 17" ADC (CRT) Display
The Ad of the Apple Studio Display

Eventually I come across one with a junk one. It has cracks at the front panel. Moreover, there were scratches over the screen. The seller asked for about US$12 for this junk monitor. 


Apple Studio 17" ADC (CRT) Display
The Screen is Full of Scratches.


Apple Studio 17" ADC (CRT) Display
Cracks Around the Apple Logo.


Apple Studio 17" ADC (CRT) Display
The Pic is Blurred, I am Not Sure if there were a Crack at its Back.

This monitor is heavy. After considering the possible huge shipping cost, I asked the seller if he could send the stand to me. He agreed and the deal was reached. Shipping cost for this is about US$25.

After some days, the stand arrived in a strong box.


Apple Studio 17" ADC (CRT) Display
The Stand of Apple Display was being Packed in a Strong Box.

Apple Studio 17" ADC (CRT) Display
There is only Few Scratches on the Stand.

It is in good condition. I am glad that now I have a complete Studio Display in my collection.

Written by: Erik Siivel (@siivel.com)
Modder | Producer | Blogger | Youtuber 
Email: siiveldotcom@gmail.com

Friday, November 6, 2015

Installing Mac OSX El Capitan on iMac G3 i7

The Mac OSX El Capitan was issued on 30 Sept 2015. I upgraded this new OS from Yosemite yesterday, however. It is because I have almost 50,000 pictures in my Mac. I need plenty of time to back them up securely before making big changes.

Before the upgrade, I backed up the data on my iMac once in Airport Time Capsule. And then I dragged the iPhoto Library into 2 respective external hard-diskes. I have some problem with my Apple ID, otherwise I would have backed-up those photos on iCloud, indeed. But at this stage, those measures were already secure enough.

The upgrade of the new OS is easy. Just entered into the Mac App Store and download the new OS (for about 20 minutes). After that, double-clicked the downloaded OS and the Mac will do it without any hassle.

Installing osx El Capitan
 Mac OSX El Capitan was being downloaded from Mac App Store.

Installing osx El Capitan
Choose the hard-disk for the installation.

Installing osx El Capitan
The installation took an hour.

The installion took about an hour. After that, the system will restart and the new OS will be ready.

Installing osx El Capitan
Now the new OS is ready.

In fact my iMac G3 i7 is still equipped with a 2.5" SATA2 hard-disk. The start-up speed is very very very slow. Sooner-or-later I will replace it with a SSD.

Written by: Erik Siivel (@siivel.com)
Modder | Producer | Blogger | Youtuber 
Email: siiveldotcom@gmail.com


I am Back...

I left aside my mod work during the last 3 months. Now I am back:)

During those period, I was not on vacation, I just started do something else, namely, writing articles in Cantonese  (the Hong Kong language) at Blogger; making Chinese lanterns for the Chinese Lantern Festival and establishing the "DIY Lanterns" Channel at Youtube.

Here is some of my work:


Chinese Cartoon Character Lantern
Asurada GSX | Minion Bob | Doraemon | My Melody | Bee-Do Minion | Traditional Chinese Lantern

Chinese Cartoon Character Lantern
Doraemon | Hello Kitty | Kevin Minion | Miffy


Those character lanterns were made with steel wires and crepe papers. If you are interested, please go there and have a look! All those videos are "how-to" tutorials.

Enjoy~

DIY Lanterns Youtube Channel:


Written by: Erik Siivel (@siivel.com)
Modder | Producer | Blogger | Youtuber 
Email: siiveldotcom@gmail.com