Translate

Showing posts with label Modify. Show all posts

Tuesday, April 19, 2016

Studio Display Mod - Finalized

Despite the revolution of LCD technology bring about production of HD monitors with 4K or even 5K resolutions, some people still concern not only the screen quality per se but also the overall design of a monitor (like me XD). This is one of the articles about modifying an obseleted Apple Studio Display 17" (ADC) to meet present use.

After plugging the ADC connector of the Studio Display with the ADC to DVI Adapter, the LCD screen exhibited severe electromagnetic interference...


Electromagnetic Interference on Modified Studio Display
 Electromagnetic Interference on Modified Studio Display

Which meant that image quality will be adversely affected unless the whole ADC cable is rebuild.

Therefore, I switched to the "Plan B": simply split the ADC into 3 separate cords: power, USB and HDMI. 

After switched to "Plan B", the problem of electromagnetic interference was resolved.

Some pictures were captured after finalizing the mod:


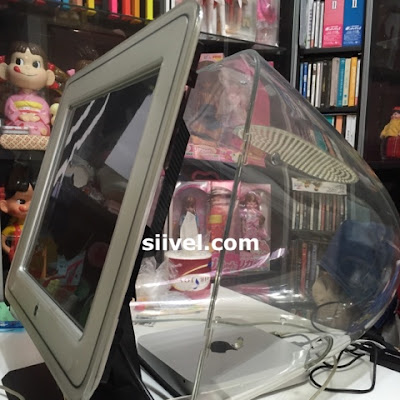
Studio Display Mod Finalized Being Plugged with Mac Mini Early 2014


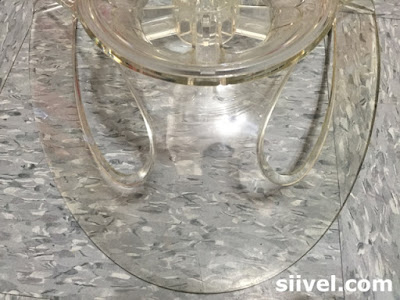
Top View of Studio Display Mod


Interior Enclosure of Studio Display Mod


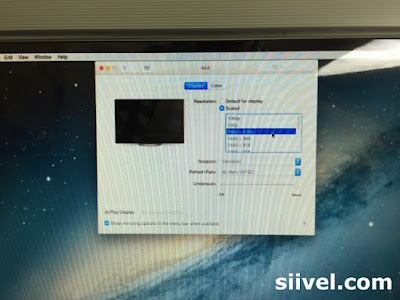
The Optimal Resolution of the Modified Studio Display is 1600x1200

The mod is completed here. The finalized product is cool. The retention of the "dummy" CRT tube and the deflection board in the rear enclosure makes the whole display looked "original", but now it is being plugged with a Mac Mini early 2014 running Mac OS X Yosemite!


Erik Siivel (@siivel.com)
Modder | Producer | Blogger | Youtuber
Email: siiveldotcom@gmail.com


Wednesday, February 17, 2016

iBook G3 Clamshell Mod - Install 1400x1050 Pixels HD LCD

This is one of the passages about the iBook G3 Clamshell modification project, of which a logicboard of Intel i5 was being installed into the classic Apple iBook G3 Laptop.

We start this project in 2014. We finished it in April 2015. A video about this project was uploaded onto Youtube. And I have been using it for almost a year.

Actually, I am very satisfied with its performance:

The i5 CPU is fast. The system is very quiet, stable and smooth, even if being upgraded to Mac OS X El Capitan.

Temperature of CPU is around 50 degree celsius all time.

The design of iBook Clamshell is the most elegant laptop ever. The idea of inclusion of a handle is great. I like carry the iBook with the handle. No pouch or cover is ever needed.

I applied a layer of protective film onto the shell. The skin protects the laptop and is still adhere firmly after a year. There is no need to buy any cover for it.

It is amazing to use a classic laptop like this, perform contemporary tasks effectively after 16 year of its first issue.

However, honestly speaking, there are some limitations to the modified iBook.

First, the screen resolution is limited to 1024 by 768 pixels. Which is a very low technology in these days.

Secondly, the battery life is about 3.5 to 4 hours after fully charged. I am not satisfied with this. I will try to find out if this is caused by too many application being used at the same time.

Recently, the iBook's LCD screen was replaced, by an aviation-graded 12" HD LCD with resolution 1400x1050 pixels.


Upgrade the LCD of iBook to 1400x1050
Upgrading the LCD of iBook Clamshell to 1400x1050


After the replacement, the System Preferences Window becomes smaller. Now the display can show more information; and it will be more meaningful to use the multi-tasking of Mac OS X El Capitan.


The resolution of 13" Macbook Air 2015
The Screen Resolutions of Macbook Air is 1440x900


In Apple's official site, it is declared that the resolutions of 13" MBA is 1440x900 whereas 11" is 1366x768. Now we have more pixels but in a smaller panel!

Erik Siivel (@siivel.com)
Modder | Producer | Blogger | Youtuber
Email: siiveldotcom@gmail.com


Sunday, January 24, 2016

Studio Display Mod - Assembled

Despite the revolution of LCD technology bring about production of HD monitors with 4K or even 5K resolutions, some people still concern not only the screen quality per se but also the overall design of a monitor (like me XD). This is one of the articles about modifying an obseleted Apple Studio Display 17" (ADC) to meet present use.
There are at least 2 ways to modify the Studio Display: the easier way is to migrate the original LCD circuit board into the studio display. But I dislike this idea not only because there will be 2 lines out (the power cord and the DVI/VGA cord), but also this sacrifices the functions of USB at the right side of the monitor.

Therefore, I adapted another way: cobined the signal, the USB and the power cords into one ADC cord. Then there will be one ADC line out. It would be terrific! However, this associates more scoldering work and higher cost as I need to buy an ADC to DVI adapter for the monitor.


Assemble of the Apple Studio Display (17" ADC)

After completing the "dummy" CRT and installation of circuit board therein, I re-attached the mount assembly with it, by placing the edge of the stand tilt base in the bezel channel, as shown in pic 1.

Next, install the video assembly to the neck of the "dummy  CRT" and fasten the nect clamp with a screwdriver (pic 2).

Then returned the video can in its original position (pic 3).

Afterwards, re-install theCRT shroud with screws (pic 4).

Friday, January 22, 2016

Studio Display Mod - Duplicating the Cathode Ray Tube

Despite the revolution of LCD technology bring about production of HD monitors with 4K or even 5K resolutions, some people still concern not only the screen quality per se but also the overall design of a monitor (like me XD). This is one of the articles about modifying an obseleted Apple Studio Display 17" (ADC) to meet present use.


I want to preserve the original look of the Apple Studio Display 17" ADC. However, it is not possible unless the Cathode Ray Tube (CRT) of the display is duplicated.


I made the CRT with a mold. It took me two months to finish it. It could be faster if the Hi-tec 3D printer is use to make it.

After making the CRT, I attached the LCD panel in front of it.

Duplicating the CRT

After that, I re-attached the metal cover and the arcrylic cover at the back of the CRT.

Re-attached the Covers for the CRT

Work still in progress...

Sunday, December 20, 2015

Studio Display Mod - Protective Film for the Display

Despite the revolution of LCD technology bring about production of HD monitors with 4K or even 5K resolutions, some people still concern not only the screen quality per se but also the overall design of a monitor (like me XD). This is one of the articles about modifying an obseleted Apple Studio Display 17" (ADC) to meet present use.
The Studio Display is heavy. It is about 45.8 lb (21 kg). The whole weight of the display is being sustaied by the stand. To make it worst, as the monitor is already a very old item, there will be some depreciation, degrading or weakening of the structure, including the stand. Therefore, whether it is still fit to hold the CRT is in doubt. In fact, my original Studio Display has been broken at the stand.

After the modification, the display will be much lighter, as the CRT will be removed. However, it is still a good idea to strengthen the structure of the stand to prevent it from damage and extend its lifespan.

DIY Protective Skin for Apple Studio Display
Making a Protective Skin for the Stand


We have initiated a number of proposals, but finally, we found that applying Bestskinsever protective skin on the stand of the Studio Display appears to be the best solution.


DIY Protective Skin for Apple Studio Display
Finished! (Front View)

DIY Protective Skin for Apple Studio Display
Finished! (Rear View)

DIY Protective Skin for Apple Studio Display
The Bestskinsever Skins on the Display Stand is Hardly Noticed


The on scale blueprint will be uploaded in another passage, you may need it if you have this monitor, even if you don't mod it.

DIY Protective Skin for Apple Studio Display

Tuesday, December 8, 2015

Studio Display Mod - Polishing the Case

Despite the revolution of LCD technology bring about production of HD monitors with 4K or even 5K resolutions, some people still concern not only the screen quality per se but also the overall design of a monitor (like me XD). This is one of the articles about modifying an obseleted Apple Studio Display 17" (ADC) to meet present use.
Polishing the shell is one of the most important step of our current Studio Display modification project as our goal is to give a junk Mac a new life. "A new life" not only limited to the innards spec but also to the outlook.


Scratches on the Mac
There were Many Scratches over the Case of Studio Display


Used Macs always unavoidably have the surface scratched in varying degrees. By rubbing the case with liquid polish, we remove the scratches and creat a smooth and shiny surface.


Dents on the Mac
Dents on the Studio Display


For the Studio Display I am modifying, as it was originally an inoperative junk item, or perhaps a trash-picked item :), there are hundreds of scratches on the shell, some areas even have dents thus even polish is no use (sad). But we still try our best to renovate it.

We first use some Tamiya sand papers to rub the heavy scratch, then by liquid polish 3000 (particle size about 3 micrometres) followed by 9800 (particle size about 1 micrometre). Now most of the scratches has been removed.

Mac After Being Polished
Studio Display - After Being Polished

Saturday, December 5, 2015

Studio Display Mod - About ADC Connection

Despite the revolution of LCD technology bring about production of HD monitors with 4K or even 5K resolutions, some people still concern not only the screen quality per se but also the overall design of a monitor (like me XD). This is one of the articles about modifying an obseleted Apple Studio Display 17" (ADC) to meet present use.
Using ADC (Apple Display Connector) is one of the distinguishing features of the Studio Displays debuted by Apple during 2000-2003.


Apple Display Connector


The ADC combines analog and digital video signals, USB, and power all in one cable. Users only need to plug that one and only one cable exert from an ADC monitor to the Mac which has an ADC connection, and it will provide power and signals required for the display connected.

Apple Studio 17 CRT Display (ADC) was the last CRT display issued by Apple, it has also an ADC connection. Unlike other CRT displays of its time, ADC is the only cable out for this monitor.


ADC Cable of Apple Studio 17 CRT Display (ADC)
The ADC Cable will be preserve in my mod work


Some people complain about the lack of compatibility of the ADC connector. When a device which has DVI only, one need to buy an DVI to ADC adapter for his/her ADC-only monitor. The adapter itself was not cheap, about US$149 at that time. Even if one has this adapter, s/he will find it incompatible with Apple Studio 17 CRT Display (ADC).

I personally, however, adore this connector as I dislike too much cables on the table.  The idea which combines all proprietaries into one cable is really terrific cos I don't need to care about all complex connections; also, I Don't need to find power cord/VGA/DVI/Display port for my monitor.

For the upcoming modification work, I am planning to preserve this ADC cable for the Studio Display. I don't want to make several holes for a power cord, a Display Port, a VGA/DVI, that is stupid. At the same time, I will made an adapter so that it will be able to connect with the latest Macs like Intel Mac Minis.
Modder | Producer | Blogger | Youtuber
Email: siiveldotcom@gmail.com

Tuesday, December 1, 2015

Siivel Youtube Channel - 500 Subscribers Reached

We are so happy that our channel at Youtube, now have 500 people subscribing. That is really out of our initial expectation.

siivel.com Youtube Channel

Originally, we were just to share our iMac G3 i7 Modification Project. Subsequently, watchers keep giving their comments and we modified a Clamshell, an Airport Harddisk, and a iMac G3 Version 2.

In fact, we are still working on our list of different projects. Which includes:

(a) upgrading the screen resolution of iMac G3 and Clamshell;
(b) modifying a Studio CRT Display;
(c) modifying a Tower G4 and perhaps a G4 Cube; and
(d) modifying an iBook G4.

Our workshop is in a total mess...-_-;

I understand that I have severe sound crack and my English is not good. I will try my best to improve. We might add sub titles in the videos; or even fire Erik out as a reporter. Anyway, thank you so much for your patient watching.

Thank you so much for your support, we will keep working on those work and bring to you more surprising mods soon!

Erik Siivel (@siivel.com)
Modder | Producer | Blogger | Youtuber
Email: siiveldotcom@gmail.com

Thursday, November 26, 2015

Studio Display Mod - Take Apart the CRT

Despite the revolution of LCD technology bring about production of HD monitors with 4K or even 5K resolutions, some people still concern not only the screen quality per se but also the overall design of a monitor (like me XD). This is one of the articles about modifying an obseleted Apple Studio Display 17" (ADC) to meet present use.
Here's a Service Source of the Apple Studio 17 Display (ADC). After reading that, you will be able to disassemble your Studio Display:

http://tim.id.au/laptops/apple/displays/studio17adc.pdf

After disassembled the Display, you will have the following stuffs:

(a) the Outer Case - comprising of the front bezel, the rear housing and the stand;
(b) the deflection board; and
(c) the CRT.

Among these, the CRT is our subject matter which needs to be replaced by a LCD.

However, the CRT has leaded glass and poisoning substances inside. So when you take apart of it you need to pay special attention. Remember not to break the glass or you might be exposed to those poisoning substances therein. After take apart the CRT, hand over to e-scarp porofessionals for handling. 

After disassemble the display, I applied glue between the front bezel and a 16" LCD.

Modifying Apple Studio CDT Display (ADC)
Mac OSX Yosemite Shown Up in Apple Studio CRT Display (ADC)

Is that a good idea to modify the display this way?


Modifying Apple Studio CDT Display (ADC)
The CRT was being replaced by a 16" LCD Panel

I think it is amazing to see an Apple Studio CRT Display (ADC) works with a Mac Mini.

It is just the beginning. Please stay tuned to this blog:)

Wednesday, November 25, 2015

Studio Display Mod - An Idea

Despite the revolution of LCD technology bring about production of HD monitors with 4K or even 5K resolutions, some people still concern not only the screen quality per se but also the overall design of a monitor (like me XD). This is one of the articles about modifying an obseleted Apple Studio Display 17" (ADC) to meet present use.
In the early 2000s, Apple manufactured several displays bearing the name as "Studio Display". The Studio Didplay I am referring to, in this article, is the "Apple Studio Display 17 (ADC)", which was introduced by Apple in July 2000 and terminated in May 2001.


Apple Studio CRT Display (ADC)
Apple Studio Display 17 (ADC)


This Apple display is a "D-shaped" monitor with a Diamondtron CRT installed. It has a viewable area of 16”.  Its  connection via an ADC connector meant it could be used with a Power Mac G4 and a Power Mac G4 Cube only.

It is a beautiful monitor with a clear acryl-plastic housing.  The display adapted the Apple Display Connector (ADC) technology which was a new technology at that time which accepts power and signal simultaneously.

It is one of the Masterpieces of Apple. Yet, due to its limited compatibility with merely Power Mac G4 and the G4 Cube, it became obsolete quickly.

Some people had some creative idea changing it into a hamster home. I however thinking if I could make it compatible with the latest Mac. For example, replace the CRT by an LCD, using the mini display port as the connector. Have you got other ideas in modifying this?


Modder | Producer | Blogger | Youtuber
Email: siiveldotcom@gmail.com

Saturday, June 6, 2015

iMac G3 Mod - Its Innards

After we have custom-made a CRT back for the LCD Panel, we put all the hardwares needed therein, which include logic board, fan, harddisks, sound controller board, and wires.

After several attempts and amendment, We were successful in putting those stuffs firmly and orderly inside the CRT back respectively, we call the whole structure "CRT-shaped Console" because it is now the brain of the new iMac.

In fact, connecting the wires between hardwares would be another challenge, it is because space inside the CRT-shaped Console is very limited. We have to use as least wires as possible to seize every milli-meter inside the Console.

Core, cRT, G3, i7, iMac, Intel, Modify, Project, siivel.com, Upgrade, 改, 改造, 計劃, 計画,

Apart from making a CRT-shaped Console, we also retain the video board inside the iMac. By doing so, the modify iMac will be more resemble to the original one. However, this improvement comes with the expense of a heavier iMac.

Core, cRT, G3, i7, iMac, Intel, Modify, Project, siivel.com, Upgrade, 改, 改造, 計劃, 計画,

Related Articles:

iMac G3 Mod - What is iMac G3?
iMac G3 Mod - iMac G3 "i7": an iMac G3 with i7 CPU


Written by: Erik Siivel (@siivel.com)
Modder | Producer | Blogger | Youtuber 
Email: siiveldotcom@gmail.com

Thursday, May 28, 2015

iMac G3 Mod - iMac G3 "i7": an iMac G3 with i7 CPU

The original meaning of iMac G3 refers to the all-in-one desktop computer produced by Apple computer during 1998 to 2003 with a PowerPC G3 processor.

As a product of more than a decade. What can we make use of it in 2015?

(1) it is still a perfect tool for word processing.

(2) it can be used as a music player.

Anything else?

Honestly speaking, even if its hardware is still in good condition, its specification is unfit to meet our needs these days. Nowadays, computers need to handle more complex tasks, such as, backup data of mobile devices, edit and play HD movies, storage of photos, entertainment... Some tasks even need to implemented wirelessly, like sending media messages, syncing data with iCloud, and so on.

If we still want it to be our perfect companion, why don't we upgrade its hardware to meet this goal? Accordingly, we need to treat the iMac G3 housing as an ordinary computer case, in which the elements inside would be replaced and upgraded with latest ones.

iMac G3 "i7" is an integration of old with new elements. We replace the PowerPC G3 logicboard of iMac G3 with an Intel i7 logic board. The outlook of the iMac G3 has no change, but there is "a big change" inside. Instead of calling this modified machine iMac G3, we name it as "iMac G3 i7".

Up to this moment (March 2015), the iMac G3 i7 could be upgradable to the highest possible specification of 4GHz Intel Quad Core i7 with 32GB memory. 


All-in-one, Apple, iMac, G3, Modification, Modify, i7, Intel, Core, PowerPC G3, Siivel, siivel.com,

Related Articles:

iMac G3 Mod - What is iMac G3?
iMac G3 Mod - iMac G3 "i7": an iMac G3 with i7 CPU


Written by: Erik Siivel (@siivel.com)
Modder | Producer | Blogger | Youtuber 
Email: siiveldotcom@gmail.com


Thursday, December 18, 2014

iBook Clamshell Mod - Connecting the LCD Panel with the Main Body

This is one of the passages about the iBook G3 Clamshell modification project, of which a logicboard of Intel i5 was being installed into the classic Apple iBook G3 Laptop.
Instead of using a 800x600 resolution LCD panel, we replace it by a new one with 1024x768. It is because a 800x600 LCD couldn't show all contents of Mac OSX Yosemite.


1024x768, 800x600, Apple, Clamshell, G3, Haswell, iBook, Intel, Core i5, LCD, Macbook Air, Modification, Modify, Siivel, siivel.com, クラムシェル, シェル, 改, 改造, 改造計画, 改造計劃,

After we install the new LCD, we rearrange the wires as shown in the above picture. Then we attached the LCD with the main body of the iBook.

1024x768, 800x600, Apple, Haswell, iBook, Clamshell, G3, Modify, Modification, クラムシェル, シェル, Intel Core i5, LCD, Macbook Air, 改, 改造, 改造計画, siivel.com, Siivel,

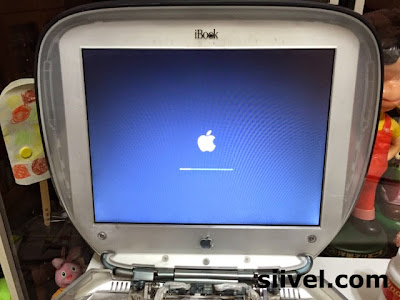
Now, the LCD was connected to the body of iBook. And it was booting Mac OSX Yosemite.

We have a video about this iBook G3 booting Mac OSX Yosemite:

http://youtu.be/X1wdGIpPuk4