A blog about Macintosh and its Modification Projects. We have a channel in youtube and our related web site is www.siivel.com. Please come and visit and share if you like!
Translate
Showing posts with label Mac OSX. Show all posts
Showing posts with label Mac OSX. Show all posts
Friday, November 13, 2015
Thursday, November 12, 2015
How to Pin Tab in Safari?
Pinned Tab is a new feature of Safari for Mac OSX El Capitan. For those sites which support Pinned Tab, after one pins the site, a small icon will be shown up at Pinned Tab, otherwise, the first letter will be chosen in lieu of an icon.
Adding a site to Pinned Tab is simple:
(1) Open the site you want to add into the Pin Tab, in my example, Apple.com.
(2) Place the pointer on the site tab and right-click (Control+Click), a box "Pin Tab" will appear.
(3) Choose "Pin Tab" and the Site's pin icon will be added into the Pinned Tab.
(2) Place the pointer on the site tab and right-click (Control+Click), a box "Pin Tab" will appear.
(3) Choose "Pin Tab" and the Site's pin icon will be added into the Pinned Tab.
Isn't that easy?
Erik Siivel (@siivel.com)
Modder | Producer | Blogger | Youtuber
Email: siiveldotcom@gmail.com
Labels:
Add Site,
Apple,
El Capitan,
How to,
Mac,
Mac OSX,
Pin Tab,
Pinned Tab,
Pinned Tab Icon,
Safari
Wednesday, November 11, 2015
"Brightness Slider" for Mac OSX Review
Yesterday I come across an app at Mac App Store which is used to manupulate the screen brightness. It is called "Brightness Slider".
 |
| Brightness Slider in Mac App Store |
Go to Mac App Store -> Download Brightness Slider -> Double-clicked It -> Install
 |
| The Adjustment Bar is Located in the Menu Bar. |
After the installation, there will be a "Sun-shaped" icon on the menu bar. Click it and you can adjust the brightness by either slide with your mouse or the press up/down buttons.
 |
| Brightness in Maximum Level. |
 |
| Reduce the Brightness. The screen will become completely dark if one slides the bar to the other extreme. |
This app is free at Mac App Store. Worth downloading before it was charged:)
Erik Siivel (@siivel.com)
Modder | Producer | Blogger | Youtuber
Email: siiveldotcom@gmail.com
Monday, July 7, 2014
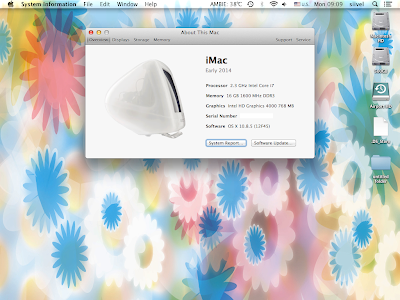
Modifying the "About This Mac" Section (2)
 |
| About This Mac Section Modified |
Finally, I edited the "About the Mac" section as shown in the above image (^^).
Written by: Erik Siivel (@siivel.com)
Modder | Producer | Blogger | Youtuber
Email: siiveldotcom@gmail.com
Sunday, July 6, 2014
Modifying the "About This Mac" Section
While modifying the iMac G3 with updated hardware, what I focus is to make its outlook as original as possible. However, it will be even more perfect if the "About This Mac" section could be modified. Honestly speaking, it is quite odd to have a Mac Mini shown in an iMac g3 Mod (-. -;)
Today, I found an old article dated 11 Dec 2012, which explains a way to customize the "About This Mac" section of Mac OSX. Accordingly, the Mac Mini icon of that section could be changed to iMac G3 icon, making the Mod more original not only outside but also inside.
Here's the URL:
http://www.tonymacx86.com/general-help/79536-mod-about-mac.html
And Relevant Video:
https://www.youtube.com/watch?v=ae9TFZGziQQ
It appears that such customization is not possible for Mac OSX Yosemite.
Written by: Erik Siivel (@siivel.com)
Modder | Producer | Blogger | Youtuber
Email: siiveldotcom@gmail.com
Subscribe to:
Posts (Atom)


