Translate

Showing posts with label How to. Show all posts

Monday, April 18, 2016

Fixing Discolouration of iBook Clamshell

Last Article:

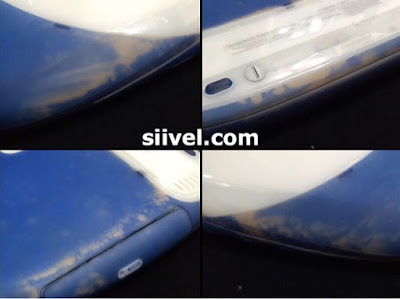
Discolouration is a very common phenomena for iBook G3 Clamshell. Yet it is quite unusual that there are almost no article mentions about this in google, not to mention any remedy solution.

In my last article, I shown an Indigo Clamshell with plenty of white marks scatter over the rubber parts. It is frustrating to see a vintage Mac which is still fully functional but has such a poor cosmetic condition. So I decided to find a way to fix it.

Discolouration of iBook Clamshell

I thought that painting, perhaps, the best solution. After several attempts, I found that the permanent ink by "Shiny" done the job satisfactorily.

Shiny Permanent ink to Fix iClam Discolouration
Shiny Blue Permanent Ink

Here were the photos taken after the paint work...
 iBook Clamshell After Repaint
iBook Clamshell After Repaint

 iBook Clamshell After Repaint
iBook Clamshell After Repaint

 iBook Clamshell After Repaint
iBook Clamshell After Repaint

 iBook Clamshell After Repaint
iBook Clamshell After Repaint

After the paint work, I applied a layer of protective film onto the shell. Wow, it is totally amazing, isn't it?


There is a video about the work:


Erik Siivel (@siivel.com)
Modder | Producer | Blogger | Youtuber
Email: siiveldotcom@gmail.com
Tuesday, February 2, 2016

How to Remove Scratches on Your Macintosh?

Every Macintosh is piece of Art. When a person chooses to buy a Macintosh, normally s/he takes into account the design or outlook in the buying decision. The good experience of using it not only comes from the specs but also the cool designs of the machines.

It will be great if it could always maintain a gloss outlook as newly purchased. Unfortunately, sometimes, we may make scratches out of accidents. If there is such a case, polishing it will "cure". 

Polish the case of vintage Macintoshes like iMac, iBook or Macbook is not difficult at all. All you need are the right materials and patient.

Please bear in mind that not all Macintoshes require polishing. The tutorial here does not apply to those with a factory made rough surface (like the Classic, Or Apple II) and those with a metal case (like Macbook Air or Macbook Pro).

There are several materials I usually use to remove scratches, the choice depends on the deepness of the scratches. The following passage will start from the ones with the strongest abrasive power:

(1) Sand Paper: it is used to abrase severe marks on the plastic case. You may apply water during the work.
Sand Paper
(2) Polish Notion: the one with a red bottle has particles of 3 mini-metres whereas the one with the yellow bottle has smaller particles of about 1 mini-metre. When your Mac has light scratches, it is better to skip the sand paper and use the red bottle instead. The yellow one is normally used to make a gloss surface after removal of scratches.

Polish Notion

(3) Tamiya Polishing Compound: I use it when all the scratches are removed. It provides a perfectly smooth and glossy finish.

Tamiya Polishing Compound

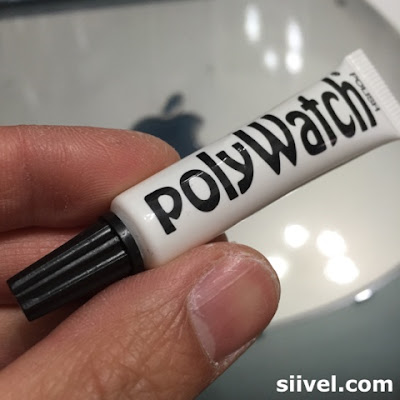
(4) Poly Watch: I use it in the very final stage. It makes a even more glossy effect compare with the Tamiya Compound. But it is extremely expensive.

Poly Watch

How to Polish?

First you need to access the severeness of your scratch, if the scratch is mild, you may skip the sand paper and use polish notion directly. I rarely use Tamiya Compound or Poly Watch in the very beginning.

And then applies the polish notion onto a soft cloth (I prefer cloths being cut from an old T-shirt), and rub the scratch by making small circles. For a normal scratch I usually rub thousands of times, it might takes several weeks to clear a mark. So the clue is "patient". 

Erik Siivel (@siivel.com)
Modder | Producer | Blogger | Youtuber
Email: siiveldotcom@gmail.com

Saturday, January 30, 2016

(Retro Computing) How to Install Mac OS X 10.4 (Tiger)

Mac OS X 10.4 Tiger Installer Disc

Apple Mac OS X 10.4 (Tiger) was released to the public on 29 Apr 2005 for US$129.95 as the successor to Panther.

Tiger, imho, is the one of the most popular OS X ever released by Apple because it could be run on a large variety of vintage Macs.

To use Mac OS X 10.4 Tiger, your Macintosh needs:

(1) PowerPC G3, G4, or G5 processor;

(2) Built-in FireWire;

(3) At least 256 MB of RAM (128 MB could still run it unofficially);

(4) DVD drive (DVD-ROM), Combo (CD-RW/DVD-ROM) or SuperDrive (DVD-R) for installation;

(5) At least 3 GB of free disk space; 4 GB if you install the XCode 2 Developer Tools;

Now let begin the installation!

After you insert the installer disc into the CD rom, press "C" button snd "power" button simultaneously until you see the apple logo on grey background.

Mac OSX 10.4 Tiger Installation

Then a screen appears ask you to select the language of the OS you are going to install. After choosing your language, click the blur button at the lower right-handed corner.

Mac OSX 10.4 Tiger Installation

The next page is the welcome message, just click "Continue" to skip.

Mac OSX 10.4 Tiger Installation

Next, you need to agree to the licence agreement before proceeding further.

Mac OSX 10.4 Tiger Installation

Before selecting a destination for the installation, I suggest you to click the "Option" icon. You will be asked to choose among the followings:

(1) Upgrade the OSX;

(2) Archieve and install;

(3) Erase and install.

I picked "Erase and install" in this tutorial.

Mac OSX 10.4 Tiger Installation

Mac OSX 10.4 Tiger Installation

Your Mac will check your installation DVD before installing the OS (this step takes about 17 minutes).

Mac OSX 10.4 Tiger Installation

And the installation takes about another 55 minutes.

Mac OSX 10.4 Tiger Installation

When installation finishes, the system will restart automatically in 30 seconds.

Mac OSX 10.4 Tiger Installation

Installation finished! It took me 1 hour 24 minutes for the whole installation.

Mac OSX 10.4 Tiger Installation

Hope this help!

Erik Siivel (@siivel.com)
Modder | Producer | Blogger | Youtuber
Email: siiveldotcom@gmail.com
Sunday, December 20, 2015

Studio Display Mod - Protective Film for the Display

Despite the revolution of LCD technology bring about production of HD monitors with 4K or even 5K resolutions, some people still concern not only the screen quality per se but also the overall design of a monitor (like me XD). This is one of the articles about modifying an obseleted Apple Studio Display 17" (ADC) to meet present use.
The Studio Display is heavy. It is about 45.8 lb (21 kg). The whole weight of the display is being sustaied by the stand. To make it worst, as the monitor is already a very old item, there will be some depreciation, degrading or weakening of the structure, including the stand. Therefore, whether it is still fit to hold the CRT is in doubt. In fact, my original Studio Display has been broken at the stand.

After the modification, the display will be much lighter, as the CRT will be removed. However, it is still a good idea to strengthen the structure of the stand to prevent it from damage and extend its lifespan.

DIY Protective Skin for Apple Studio Display
Making a Protective Skin for the Stand


We have initiated a number of proposals, but finally, we found that applying Bestskinsever protective skin on the stand of the Studio Display appears to be the best solution.


DIY Protective Skin for Apple Studio Display
Finished! (Front View)

DIY Protective Skin for Apple Studio Display
Finished! (Rear View)

DIY Protective Skin for Apple Studio Display
The Bestskinsever Skins on the Display Stand is Hardly Noticed


The on scale blueprint will be uploaded in another passage, you may need it if you have this monitor, even if you don't mod it.

DIY Protective Skin for Apple Studio Display

Tuesday, December 8, 2015

Studio Display Mod - Polishing the Case

Despite the revolution of LCD technology bring about production of HD monitors with 4K or even 5K resolutions, some people still concern not only the screen quality per se but also the overall design of a monitor (like me XD). This is one of the articles about modifying an obseleted Apple Studio Display 17" (ADC) to meet present use.
Polishing the shell is one of the most important step of our current Studio Display modification project as our goal is to give a junk Mac a new life. "A new life" not only limited to the innards spec but also to the outlook.


Scratches on the Mac
There were Many Scratches over the Case of Studio Display


Used Macs always unavoidably have the surface scratched in varying degrees. By rubbing the case with liquid polish, we remove the scratches and creat a smooth and shiny surface.


Dents on the Mac
Dents on the Studio Display


For the Studio Display I am modifying, as it was originally an inoperative junk item, or perhaps a trash-picked item :), there are hundreds of scratches on the shell, some areas even have dents thus even polish is no use (sad). But we still try our best to renovate it.

We first use some Tamiya sand papers to rub the heavy scratch, then by liquid polish 3000 (particle size about 3 micrometres) followed by 9800 (particle size about 1 micrometre). Now most of the scratches has been removed.

Mac After Being Polished
Studio Display - After Being Polished

Friday, November 13, 2015

How to Use Split View of Mac OSX El Capitan

One of the most appealing features in the new OS X El Capitan is allowing users to put two apps into one screen together, splitting side-by-side. So that you don't need to switch from one application to another via Mission Control.

(However, please note that not all application in Mac OSX El Capitan support the split screen.)

Follow the steps for splitting the screen:


(1) Go to “System Preferences” -> "Mission Control" -> check the box “Displays have separate Spaces”.

(2) Maximize the screen of an application (in this example, Safari) by clicking the green button at the upper-left-hand corner of the window. The application which support split screen should have 2 arrows in opposite directions within the green button, instead of a "+" sign.

Splitting the Screen of Mac OSX El Capitan

(3) Repeat the procedure of (1) for maximizing another window (e.g. TextEdit) which you want to split the screen.


(4) Now you have 2 applications running full-screen mode. Then launch "Mission Control" and you will see 3 thumbnails at the top of the screen, namely, "Desktop", “Safari" and “TextEdit”.


Splitting the Screen of Mac OSX El Capitan

(5) Drag the thumbnail of "TextEdit" into that of “Safari”, or vice versa, then the windows will be merged into one.


Splitting the Screen of Mac OSX El Capitan


Splitting the Screen of Mac OSX El Capitan

(6) To resize the windows, click and drag the black margin between the 2 screen leftwards or rightwards.


Resizing Split Screens
Drag the Black Margins Between 2 Applications to Resize.

Erik Siivel (@siivel.com)
Modder | Producer | Blogger | Youtuber
Email: siiveldotcom@gmail.com

Thursday, November 12, 2015

How to Pin Tab in Safari?

Pinned Tab is a new feature of Safari for Mac OSX El Capitan. For those sites which support Pinned Tab, after one pins the site, a small icon will be shown up at Pinned Tab, otherwise, the first letter will be chosen in lieu of an icon.

Adding a site to Pinned Tab is simple:

(1) Open the site you want to add into the Pin Tab, in my example, Apple.com.

Adding a site to Pinned Tab

(2) Place the pointer on the site tab and right-click (Control+Click), a box "Pin Tab" will appear.


Adding a site to Pinned Tab

(3) Choose "Pin Tab" and the Site's pin icon will be added into the Pinned Tab.


Adding a site to Pinned Tab
Isn't that easy?

Erik Siivel (@siivel.com)
Modder | Producer | Blogger | Youtuber
Email: siiveldotcom@gmail.com




Thursday, October 30, 2014

Apple Yo-Yo Adapter

Apple, iBook, Clamshell, G3, How to, Crack Open, laptops, siivel.com, Siivel, Yo Yo Adapter,
Apple Yo Yo Adapter

Apple's Yo-Yo Adapter (1999) is the coolest adapter ever, for sure. Actually this design was used for a very short period of time and it just compatible to a few of laptops models.

I have tried to crack-opened the Apple Yo-Yo Adapter but the shell of it has been damaged. If anyone of you know the way to open it "beautifully", please let me know.

Thank you in advance.

Written by: Erik Siivel (@siivel.com)
Modder | Producer | Blogger | Youtuber 
Email: siiveldotcom@gmail.com